Workflows- Run against the *_MSCRM database
SELECT name , createdbyname,createdon,statuscodename
FROM FilteredWorkflow
Reports run against the ReportServer database
Select [Name],
[Description],
SubString([Path],1,Len([Path]) - (CharIndex('/',Reverse([Path]))-1)) As [Path],
Case
When [Hidden] = 1
Then 'Yes'
Else 'No'
End As [Hidden]
From [Catalog]
Where [Type] = 2
Order By SubString([Path],1,Len([Path]) - (CharIndex('/',Reverse([Path]))-1)),
[Name]
Tuesday, 29 April 2014
Wednesday, 9 April 2014
Increase the attachment size to 10mb CRM 4
The default attachment file size limit in
Microsoft Dynamic CRM 4.0 is 5 MB. There is good reason for this - as a
general rule you should be placing some restrictions on the amount of file data
that can enter CRM so that the database can maintain a reasonable size and so
that performance is optimized. However, your business may find the need to increase this
size a little in order to handle larger file attachments. Here
are the instructions to increase the file size limit to 10 MB. You can go
larger than this, but pay close attention to the table size and performance
over time as you want to keep CRM running as well as possible. Note - even
though the System Settings option looks like this it would apply
to email attachments only, it does apply to "notes" type
attachments as well. Finally, this procedure to change the max attachment size is
not an officially published recommendation, so
use this at your own risk. How to
increase the max attachment size in CRM 4.0:
1. Open the application web.config (C:\Inetpub\CRM\web.config).
2. Locate the <httpRuntime> key within the
<system.web> element and change the values to the following:
<httpRuntime
executionTimeout="9999" maxRequestLength="10240"/>
3. Locate the
<httpRuntime> key within the <system.web> element of the
<location path='MSCRMServices"> element, and change it to the
following:
<httpRuntime
maxRequestLength="10240"/>
4. Save and close the
web.config.
6. Navigate to
Settings | Administration | System Settings.
7. Click the E-mail
tab.
8. Change the maximum
file size (in kilobytes) field to 10240.
9. Click Ok to save
the changes.
10. Perform IISReset.
Tuesday, 1 April 2014
CRM 2013 Javascript Special Functions
- Xrm.Page.context.client.getClient() – Returns client type i.e. outlook, web or mobile.
- Xrm.Page.context.client.getClientState() – Returns client state i.e. online or offline.
- Xrm.Page.data.refresh() – This is one interesting as it refreshes the data on the form without even reloading the page. This also enables developers to pass a callback method.
- Xrm.Page.data.save() – Save the form
- Xrm.Page.data.getIsValid() – Returns true is form is valid for save else false
- Xrm.Page.data.setFormDirty() – Sets the form dirty for force save.
- Xrm.Page.data.entity.getPrimaryAttributeValue() – Returns the value of primary attribute
- Xrm.Page.ui.setFormNotification(message,level,uniqueId) – Sets the notification on top of the form.
- Xrm.Page.ui.clearFormNotification() – Clears the form notification
- Xrm.Page.ui.refreshRibbon() – Refreshes the ribbon. This method does not work on CRM for tablets.
- Xrm.Page.getControl(“field_name”).setNotification(“Notification”) – Sets the notification for a specific field right next to the field label. This can often be used as a custom tool tip.
- Xrm.Page.getControl(“new_name”).clearNotification() – Clears the notification
- Xrm.Page.getAttribute(“new_precision”).setPrecision(2) – Override field precision
- Xrm.Page.getControl(“createdon”).setShowTime(true) – Toggle show time at form
- Xrm.Page.getControl(“field_name”).addCustomFilter(fetchFilter, entityType) – Allows developer to add custom filter to a lookup view.
- Xrm.Page.getControl(“field_name”).addPreSearch(handler) – adds pre trigger filter to the lookup.
- Xrm.Page.getControl(“ownerid”).removePreSearch(handler) – removes the trigger
- Xrm.Utility.openWebResourceDialog(webResourceName, webResourceData, width, height) – opens a sepecified webresource as a web dialog window.
Friday, 28 March 2014
Assigning a Task to a Queue in CRM 2013 Workflow
In CRM 4.0 , tasks could be assigned directly to a queue using the assign function in a workflow.


It is not possible to use the assign function this way in CRM 2013. The assign Function only allows you to assign to a Team or User but not a queue.. Instead you have to create a queue item

And using the set properties of the queue item Specify the queue you want the queue item to go to and the Task the queue item represents

Result . Tasks item in the Registration Renewal Queue:

Thursday, 27 March 2014
Use Scribe to Upload data to CRM online 2013 from a Excel file
The folloowing are example steps on how to upload data from a CSV file to CRM 2013 online.
https://openmind.scribesoftware.com/html/insight_download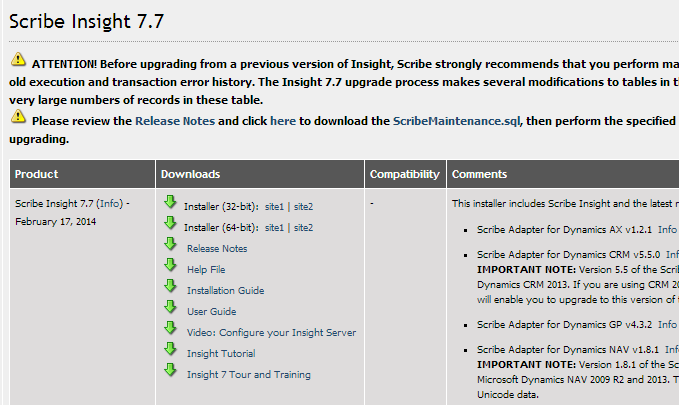
2. Run The Scribe workbench. You will have to register at this point. Follow the instructions in the Product key. You will be presented with a screen to configure source and target.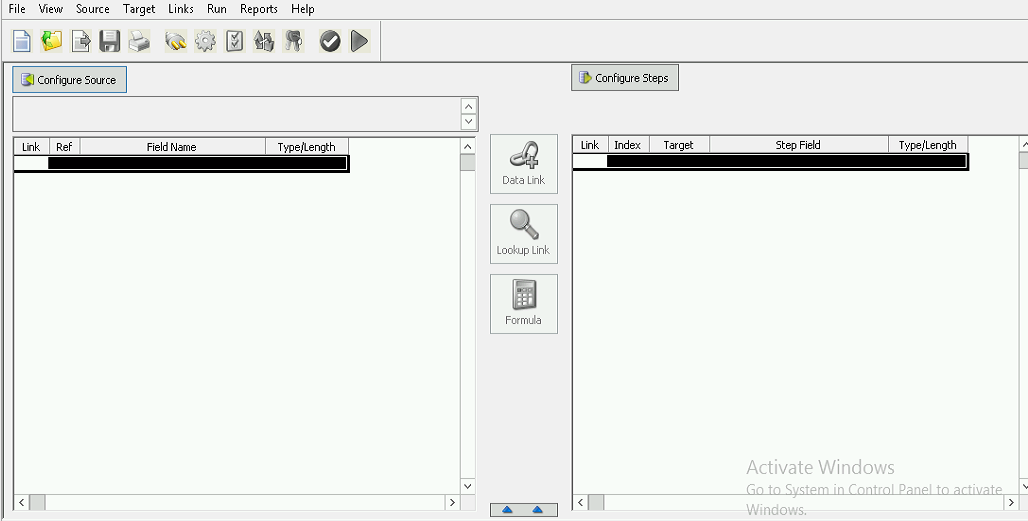
3. Configure the Source for the CSV file. Click Configure Source.
4. In the connection manager click Add.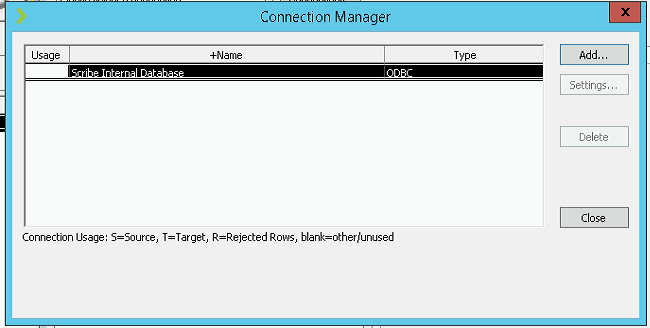
5. You need to add the odbc driver in for excel by first clicking add/Modify ODBC Data source under ODBC Data sources and then click ok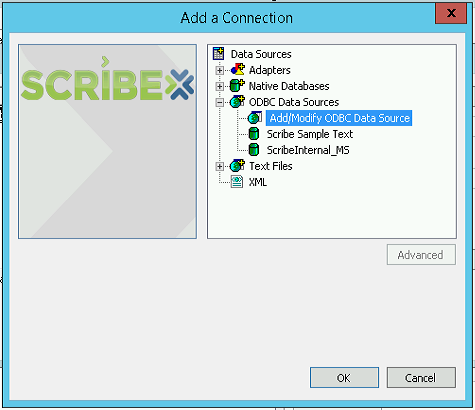
6. In the System DSN tab of the ODBC Data Source Administrator screen click add , select the Driver do Microsoft Excel(.xls)

7. Click Finish.You will then be asked to specify a name and description
 8. Click Ok and Ok again. CSV will now be in you list of drivers so select it and click ok
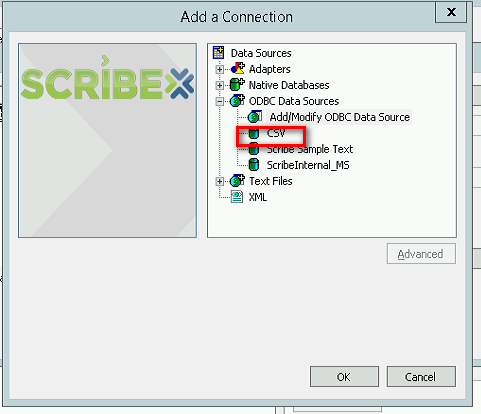
9. Select CSV on the configure source screen and select ok. The source is now set up

10. Now Configure the Target. Click on Configure Steps. Then Click on Connections , Click Add . This Time Click Microsoft Dynamics CRM under adapters and click Ok
11. You will be prompted to enter the CRM connection details. Give the connection details of your online instance.The server should be https://disco.crm4.dynamics.com in a Office 365 instance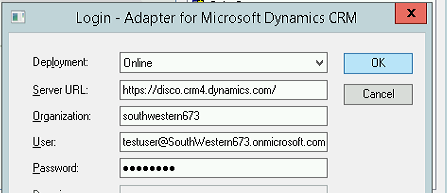
12. Click ok(wait for it to connect and then close on the connection manager screen. Select the Adapter from the drop down menu back on the configure steps screen.

13. Now you need to specify your insert steps. Under all Data objects (alphabetical) find the entity you want to insert data into first , highlight and click Add insert step.

14. Click Close on the window. You are now back to Main Scribe work Bench window where you start mapping fields. Tou can use the link button to link fields together

15 You can use the formula button to specify conditions for you link. For example in the screenshots below. Conditions are used to set the target picklist to 1 if the source ia null

16. You can test the data before running it and iron out any mismatches

17 Once Happy with all your links you can Run for real. You May get more errors at this point. Click error info once finished

18. The records will be migrated from your source csv file to your target CRM online contact entity

19. The solution can be saved and checked into a source control.
- Download and install Scripe Insight from the following location
https://openmind.scribesoftware.com/html/insight_download
2. Run The Scribe workbench. You will have to register at this point. Follow the instructions in the Product key. You will be presented with a screen to configure source and target.
3. Configure the Source for the CSV file. Click Configure Source.
4. In the connection manager click Add.
5. You need to add the odbc driver in for excel by first clicking add/Modify ODBC Data source under ODBC Data sources and then click ok
9. Select CSV on the configure source screen and select ok. The source is now set up
10. Now Configure the Target. Click on Configure Steps. Then Click on Connections , Click Add . This Time Click Microsoft Dynamics CRM under adapters and click Ok
11. You will be prompted to enter the CRM connection details. Give the connection details of your online instance.The server should be https://disco.crm4.dynamics.com in a Office 365 instance
12. Click ok(wait for it to connect and then close on the connection manager screen. Select the Adapter from the drop down menu back on the configure steps screen.
14. Click Close on the window. You are now back to Main Scribe work Bench window where you start mapping fields. Tou can use the link button to link fields together
15 You can use the formula button to specify conditions for you link. For example in the screenshots below. Conditions are used to set the target picklist to 1 if the source ia null
16. You can test the data before running it and iron out any mismatches
17 Once Happy with all your links you can Run for real. You May get more errors at this point. Click error info once finished
18. The records will be migrated from your source csv file to your target CRM online contact entity
19. The solution can be saved and checked into a source control.
CRM Online 2013 and SharePoint 2013 Document Management integration setup
The following is a guide on how to Configure CRM Online Document Management using SharePoint.
Prerequisites
Prerequisites
- Office 365 Instance with CRM 2013 and SharePoint 2013 online E2 plan
- Download the Microsoft Dynamics CRM 2013 List Component for SharePoint 2013(CRM2013-SharePoint2013-ENU-amd64.exe) at :http://www.microsoft.com/en-ie/download/details.aspx?id=40345
Steps:
- Log into Office 365 and select Sites from the upper right menu bar

- Select Team Site and copy the Team Site URL and save it for later. The URL should look something like https://southwestern673.sharepoint.com.

- Select Site Settings

- Select Solutions

- Select Upload Solution

- Run the downloaded sharepoint component earlier. It will extract the contents to a folder for you. Then Select Choose File

- Select the file named crmlistcomponent.wsp from the folder where you extracted the list component files

- Select OK
- Select the Activate button and wait for the activation process to complete

- The process may take a few minutes to complete

- It will look like this when completed

- Next we need to configure the CRM Online site to integrate with SharePoint. Select CRM from the top navigation menu

- In CRM Navigate to Settings>Document Management > Document Management Settings
- Select the entities you would like to enable for Document Management, paste the SharePoint Team Site URL that you saved from the previous step into the URL field and select Next

- Leave the Based on entity button unchecked and select Next

- Click ok

- Wait for the setup to complete and select Finish

- Document management is now set up and you can add documents to any entity configured for document management.

One Improvement of note for CRM 2013 the documents are now mapped by the entity id rather than the name field

Wednesday, 26 March 2014
Update Entity Icons CRM 2013
The blogs how to Apply icons to a custom entity in CRM
1. Download a 16*16 icon and a 32 *32 icon from the internet. Google Images is good tool to use because you can specify exact size in the search tools. Also try to find images of type ICO
https://www.google.ie/imghp?hl=en&ei=PPAyU_jjO8fLhAeSt4HQBQ&ved=0CAMQqi4oAg

2. Once you have the two icons downloaded. Uploaded them as web resources in your customization solution. You have to select the correct web resource format eg ICO (Icon)
 3. In the solution Navigate to the entity you want to apply the images to and click the update icons button
 4. Select the 16*16 icon and 32*32 icon respectively and click OK
 5. Publish
The icons will now be displayed on your Entity :

1. Download a 16*16 icon and a 32 *32 icon from the internet. Google Images is good tool to use because you can specify exact size in the search tools. Also try to find images of type ICO
https://www.google.ie/imghp?hl=en&ei=PPAyU_jjO8fLhAeSt4HQBQ&ved=0CAMQqi4oAg
2. Once you have the two icons downloaded. Uploaded them as web resources in your customization solution. You have to select the correct web resource format eg ICO (Icon)
The icons will now be displayed on your Entity :
Subscribe to:
Posts (Atom)